
About
This blog post talks about installing Ubuntu 14.04 server on my Netgear ReadyNAS.
Intro
Many, many moons ago I bought myself a Netgear ReadyNAS – a small 2 bay unit for not much money and at first I was very happy with it. But I’m a nerd! So naturally over time I want to play with things and get more out of the unit than the manufacturer wanted to give me.
What it can do
It really helped to install the root extension and be able ssh into the unit. That meant I could install dnsmasq and define some hosts in /etc/ethers and /etc/hosts so dhcp and DNS was sorted. I also installed transmission which made the unit that little bit more useful.
What it can’t do
I was always hoping for an easy way to install OpenVPN on it – after all, my unit is an x86 box running Linux; how hard can it be?! Turns out it ain’t easy – not that I tried 🙂 I read up on it and gave up before starting. So that bugged me. Friends around me started buying things like the HP ProLiant N54L MicroServer which hangs in the same price range but totally wins in every category when compared to my ReadyNAS.
The straw that broke the camel’s back was when I moved into my new house. I now share the house with non-nerds who probably should be on a separate network to me. Also, it’s always bugged me that the WiFi is bridged into my home network – so just for some added security and safety I was going to separate the house into 2 networks using the 2x1GigE nics in the NAS, only to learn that the unit can’t do NAT! There is no support for it in the kernel and I was surely not going to compile a kernel on this unit without the ability to fix things that may break.
The solution
After a bit of reading on the web I found out that you can use a serial console port on the back of the unit to get a KVM connection, so you can get a keyboard and a screen connected. You can then also boot from a USB drive and install your operating system of choice. I had previously played with FreeNAS and I do think the filesystems are better in BSD-landi but my BSD experience is non-existent and so I opted for Ubuntu server.
Ideas started to form
With the possibility of installing Ubuntu on the ReadyNAS so many things seemed suddenly possible.
- Format everything using btrfs and use it’s built-in RAID1 feature.
- Run an OwnCloud server.
- Like so many others I’m affected by a buggy out of the box modem/router which can’t do port forwarding – this can go in bridge mode and the NAS can do this.
- Separate my home network into “WiFi and others” and “privileged” 🙂
- Install an ntpd, transmission, OpenVPN
- …
How?
The serial connection
Buy the hardware
Buy yourself a little serial to USB adapter if you haven’t got one already. I didn’t and opted for the naked version (pl2303HX) which cost me just AU$6.20 including shipping! (I bought mine from top_electronics_au on ebay but am not affiliated with them in any way).
Connect the hardware
On my unit the serial port was covered by a sticker – peel that off and connect your serial adapter to the pins underneath this.

Note that you will have to connect the RX/TX lines crossed. From right to left, you’ll have +5V, then TX, RX and Ground. My serial to USB adapter mentions 3.3V and since all components are powered in some way I didn’t hook 5V and ground up – only RX/TX (crossed).

Set up the software
I was able to get minicom to work using 9600 baud and 8N1 on /dev/ttyUSB0, YMMV. After plugging in the USB to serial adapter, have a look at `dmesg | tail` to see what device has been assigned to it. Then run `minicom -c on -s` to enter setup mode and configure your connection. Exit setup mode and hit return a few times, your screen should update.
Word of warning: like with any serial connection it has issues when you hammer it – so don’t hold the backspace key and wait for your line to be deleted. You’ll have to feed in one after the other key stroke.
Back things up
Ever since I bricked a Samsung Galaxy SIII in a similar operation and didn’t have a backup I can’t stress enough how important it is that you back things up! I ran the following commands first when ssh’d into the NAS:
log_command() { echo $* >> NAS_log.txt; $* >> NAS_log.txt; }
log_command mount
log_command cat /etc/fstab
for i in /dev/md?; do log_command mdadm --detail $i; done
log_command pvdisplay
log_command vgdisplay
log_command lvdisplay
do log_command sgdisk -p /dev/sd? ; done
This will define a new command “log_command” which simply puts all arguments into a text file and then executes the arguments and puts the output in the same text file. This comes in really handy in case you’d like to restore.
Boot from the thumb drive
Now that we’re a bit more familiar with the NAS let’s boot of a USB thumb drive. The NAS won’t boot of a USB CD-ROM btw.
Create the thumb drive
I used UNetbootin to create my thumb drive.
- Plug in the USB and let it auto-mount
- Start UNetbootin as root
- Select which Ubuntu ISO you’d like to flash on the thumb drive
This gives you a fairly standard bootable USB key but we do want the console output redirected to our serial console cable and have to set up syslinux for it first.
Redirect output to the serial console
Edit the syslinux.cfg on the root of the USB key and add the following 2 lines as the first lines:
SERIAL 0
CONSOLE 0
“SERIAL 0” tells syslinux to print the output to the first serial console (0) and needs to be the first line. The second line stops syslinux from printing anything to the standard console. With those 2 lines you will get a boot menu over the serial console. The next step is to change the boot entries to also redirect output to the serial console.
This is the stanza UNetbootin creates for the “Default” entry:
label unetbootindefault
menu label Default
kernel /ubnkern
append initrd=/ubninit vga=788 -- quiet
Change the last line to:
append initrd=/ubninit console=ttyS0,9600n8
Removing “quiet” will give you the output that’s otherwise suppressed and replacing vga=788 with console=ttyS0,9600n8 again tells syslinux which serial port and other connection parameters to use.
I went through and did that for all stanzas so I could easily boot into the rescue image or the memtest.
Boot the NAS of the thumb drive
Plug the prepared USB drive into any of the USB ports and hold down the “backup” button at the front of the unit as you power it on.
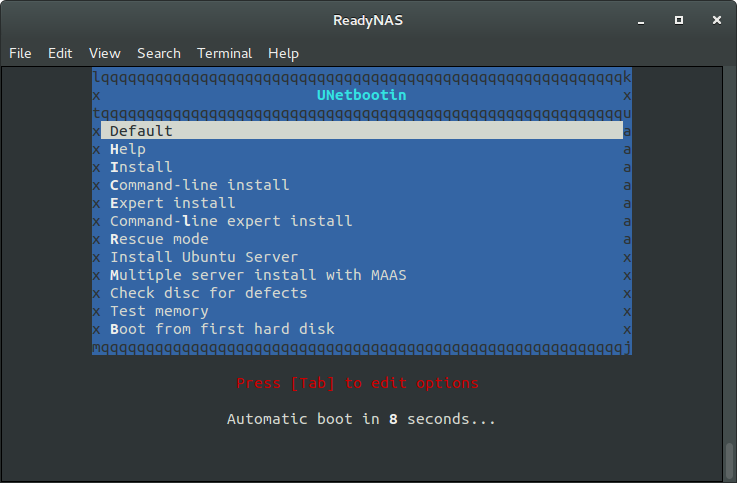
In minicom immediately start hitting the ESC key until you see the below screen:

Hit return for the boot menu or [tab] for all entries in plain text. After you’ve hit return you should see this screen:
Boot into Rescue mode
I opted to first boot into rescue mode and take a backup of all partitions. When booted from the USB key in rescue mode I found the following partitions:
- /dev/sda1 (vfat) 126MB bootable partition
- /dev/sdb1 my USB I booted from
- /dev/sdc & /dev/sdd == The 2 bays
- /dev/md125 == 2TB (c VG)
- /dev/md126 == 0.5GB (swap)
- /dev/md127 == 4GB (root)
/dev/sda1 is the bootable partition the NAS starts from but it’s inaccessible when booted normally.
Back things up
In case something went horribly wrong I wanted to be able to restore the partitions as they currently are. I didn’t have to restore anything so this is untested but dd’ing the partitions away seemed reasonable.
mount /dev/c/c /mnt/ # mount your ReadyNAS RAID volume group
dd if=/dev/md127 of=/mnt/root.fs.dev.md127.dd # copy the root partition onto the RAID volume
ls -l /mnt/root.fs.dev.md127.dd # check that the size matches roughly
-rw-r--r--    1 root     root     4293906432 Mar 31 01:15 /mnt/root.fs.dev.md127.dd
mkdir /mnt/test # create a new mount-point
mount /mnt/root.fs.dev.md127.dd /mnt/test/ # mount your copy
ls /mnt/test/ # compare things look as expected
umount /mnt/test/
dd if=/dev/sda1 of=/mnt/boot.fs.dev.sda1.dd # rinse and repeat for the boot partition
mount /mnt/boot.fs.dev.sda1.dd /mnt/test/ # mount your copy
ls /mnt/test/ # compare things look as expected
umount /mnt/test/
I then rebooted and saved the two dd files along with all my other data on a separate drive.
Install Ubuntu
This is the boring step now – as described above, boot from the USB thumb drive and select “Default” in the boot menu.
I had trouble with the installation process due to a faulty USB thumb drive but once I swapped it the installation was a breeze.
Make sure you use /dev/sda1 as the /boot partition and that you install the boot loader on /dev/sda. The installer does that automatically once you select /dev/sda1 as /boot.
Filesystems
I felt pretty adventurous and decided to go for btrfs! 
Since I don’t know how to choose btrfs’ built in raid1 capabilities from the installer I opted for the above partition layout and a life rebuild post installation.
Building a raid1
First I had to create another partition on the hard disk that’s not in use. The simplest way seemed:
cgdisk /dev/sdb
# Make sure your partition tables are identical:
sgdisk -p /dev/sda
sgdisk -p /dev/sdb
Then create the new btrfs filesystem and add it to the exisitng one to convert it to a raid1:
mkfs.btrfs /dev/sdb1
btrfs device add /dev/sdb1 /
btrfs balance start -dconvert=raid1 -mconvert=raid1 /
This worked although there is something weird going on. For some reason the reported filesystem capacity and disk usage doesn’t match up. “df” shows a total capacity of 3.7TB with 3.4TB in use. While “du” shows 1.7TB total usage on my 2TB raid1.
# df -h / /home
Filesystem      Size  Used Avail Use% Mounted on
/dev/sda1       3.7T  3.4T  258G  94% /
/dev/sdb1       3.7T  3.4T  258G  94% /home

# du -hsc /
1.7T    /
1.7T    total

# btrfs device scan
Scanning for Btrfs filesystems
btrfs filesystem show
Label: none  uuid: c5d5a3ed-2b45-4340-8e38-a107fde8df2b
        Total devices 2 FS bytes used 1.69TiB
        devid    1 size 1.82TiB used 1.69TiB path /dev/sda1
        devid    2 size 1.82TiB used 1.69TiB path /dev/sdb1
I tried an online re-balance of the raid but that didn’t work:
# btrfs filesystem balance status -v /
No balance found on '/'
# btrfs filesystem balance start -v /
Dumping filters: flags 0x7, state 0x0, force is off
  DATA (flags 0x0): balancing
  METADATA (flags 0x0): balancing
  SYSTEM (flags 0x0): balancing
 Done, had to relocate 1736 out of 1736 chunks
If I do get to the bottom of it I’ll report it here.
Edit: So you’ve had your first blackout
I thought I’d add these steps here because after my first blackout the NAS wouldn’t boot at all. It was waiting patiently for me to make a choice between “Ubuntu” and “Advanced options”.
The following lines make Grub2 select the right entries by default and also print the kernel output to the serial console for potential debugging. Edit /etc/default/grub
GRUB_DEFAULT=0
GRUB_HIDDEN_TIMEOUT=
GRUB_HIDDEN_TIMEOUT_QUIET=true
GRUB_TIMEOUT=2
GRUB_DISTRIBUTOR=`lsb_release -i -s 2> /dev/null || echo Debian`
GRUB_CMDLINE_LINUX_DEFAULT=""
GRUB_CMDLINE_LINUX="console=tty0 console=ttyS0,9600n8"
GRUB_TERMINAL=serial
GRUB_SERIAL_COMMAND="serial --unit=0 --speed=9600 --word=8 --parity=no --stop=1"
Then, don’t forget to run
sudo update-grub2
for the new settings to take effect.
Result
I am more than happy that I did this and was able to share the experience here! If you’ve got a ReadyNAS and are sitting on the fence, I highly recommended this to satisfy your inner nerd! 🙂

Thanks for the write up, I’ve been trying to get it to work on my machine but it won’t let me interrupt the boot process for some reason. I can get into the bios by hitting F4 but I can’t get to the boot menu. Any idea what the problem could be?
Excuse the late reply. No idea off the top of my head – is there an option in the BIOS that relates to that? Does the backup button work during normal operation?
Thanks a lot for the detailed instructions, this is really useful.
Any reason you decided to use the serial connector, instead of hooking up the internal VGA connector to a screen and plugging in a USB keyboard?
Cheers!
Ooops, late reply, sorry. I didn’t know there was an internal VGA connector inside 🙂 That would probably make things easier.
Hi Ludovic,
on which part of the mainboard of the rds2000v2 is the internal VGA connector?
Thank you for you answer.
Regards
Martin
I also tried this with the same device, but with Ubuntu 16.04 Server i383.
I had some issues. I’m going to write down as brain dump so others (and later me) might be able to use them.
First I couldn’t get keyboard input trough the serial connection. I could get text out, but no input into the device. I found out the serial to USB adaptor was broken. I din’t want to wait for a replacement and got my Raspberry pi to do it with the gpio pins. I still had no input until I check the connection of the GND. After this it was working. I also tried using a USB keyboard. This worked while booting and in the syslinux menu, but didn’t work in the installer.
Next problem was that the Ubuntu install kept complaining about corrupt CD image when using UNetbootin. What I did to fix it was following the toppic http://pcengines.info/forums/?page=post&id=51C5DE97-2D0E-40E9-BFF7-7F7FE30E18FE. Basically:
# unpack the iso (see link, in folder ‘new’),
mkdir old ;
sudo mount -o loop ubuntu-16.04.2-server-i38.iso old ;
mkdir new ;
shopt -s dotglob ; <—- don't ignore folders starting with a dot in the bash glob operation used in the copy below. Only for current shell.
cp -rv old/* new/ ;
# edit the files new/isolinux/isolinux.cfg new/isolinux/txt.cfg new/isolinux/adtxt.cfg:
These still have the read only attribute. If you open it in vim editor for instance, you'll have to save them with :w! instead of :w
isolinux.cfg:
—————————————————–
# D-I config version 2.0
# search path for the c32 support libraries (libcom32, libutil etc.)
serial 0 9600 <—| enable serial
console 0 |
path
include menu.cfg
#default vesamenu.c32 <—| could be changed to 'default menu.c32'
| but menu.c32 isn't installed in the default ubuntu server iso
#prompt 0 <– | without menu, we just boot the first option, which is install
#timeout 0 | that's why it needs to be commented out.
——————————————————
Lines in txt.cfg and adtxt.cfg I made look like:
append vga=off console=ttyS0,9600n8 initrd=/install.amd/initrd.gz — console=ttyS0,9600n8
changing the vga and adding the console.
The files ar
# install needed files in a host ubuntu (16.10 AMD64 in my case):
sudo apt-get install syslinux xorriso isolinux
# make a new iso:
xorriso -as mkisofs -r -R -l -cache-inodes -isohybrid-mbr /usr/lib/ISOLINUX/isohdpfx.bin -partition_offset 16 -A "Ubuntu16.04" -b isolinux/isolinux.bin -c isolinux/boot.cat -no-emul-boot -boot-load-size 4 -boot-info-table -o ubuntu-16.04.2-server-i386_serial.iso ./new/
# push it to the usb disk (sdb fi)
sudo dd if=ubuntu-16.04.2-server-i386_serial.iso of=/dev/sdb bs=1k
This USB I got booting and installed.
I could also access the bios from the serial connection and edit the fan speed a bit. I think I had to press F4 from the USB keyboard (not sure).
Maybe I'll post a second post ones everything is installed if I have some more problems.
Thanks for posting this, Sam! Great work on getting this going.
Yes, F4 gets you into the BIOS on my unit too.
I’m glad I didn’t run into those issues… is everything working now as expected?
Yes. It’s much better then my previous setup with the raspberry and USB drives. Everything working great.
I did also get issues because the drive was already installed with the readynas raid solution. From the installer I first removed all partitions of the HDD. Repartitioning the whole drive didn’t work. After choosing the new layout I had to reboot because the raid was still active.
Grub was already configured automatically to output trough the serial port and systemd nowadays follows grubs settings so Getty is also started without needing to edit something. You can log in from the serial connection without needing to edit something.
After the install I could just reboot, login trough the serial connection and set up ssh as a permanent solution.
I did have an issue with the boot partition filling up. It can only hold one kernel version. I did an apt upgrade and it failed. Had to remove the old initfs manually first to make room ‘rm /boot/initrd….’, do ‘apt install -f’ to continue the failed install an remove the old kernel with ‘apt remove linux-image-…’. I did an ‘update-grub’ just to be sure.
If the new kernel fails there is no backup!
Don’t know if there is a better way.
Sam, thanks for your detailed notes! I was able to finally get Ubuntu installation going after banging my head against same issue you ran into for a few hours (USB keyboard stopped working after the installer started). I’m waiting on the installation to finish now!
@Shaun
I recently had to install my ReadyNAS again as a neighbor put on-off my main switch of the electricity multiple times after each other which corrupted my HDD -.-
I’ve now installed Arch and it was actually easier to install than the Ubuntu.
I made a brain dump here:
https://docs.google.com/document/d/e/2PACX-1vTkA9EwNLHRhRm_nLY2jlM7K29srKMgk6C8t_P_XPS3fB-LMdOZDJ0pszBh8r2qBiWupabd7QAlfHVb/pub
Thanks for all your updates, Sam. You’ve really put in a lot of effort and research to port this to 16.04! Yeah, the whole old-kernels thing filling up my boot partition sounds way too familiar 😦 Although this normally happens to me after a few kernels have been installed and there are at least a few to fall back on – fingers crossed your system will boot!
I haven’t tried this but maybe stick an executable file like the following in /etc/cron.daily/purge-old-kernels.sh:
#!/bin/bash
purge-old-kernels -y
Don’t know how it would work with an always on (i.e. never reboot and load new kernel) solution like a NAS. Maybe a good excuse to trial the new Canoncial Livepatch service? 🙂 I don’t think it would work though I’ve never played with it.
I recently got my hands one one of these, and wanted to see how practical it was to repurpose it into a more general-purpose device. I opened the system and note that there is no obviously exposed internal VGA as intimated by a previous poster. If there is a VGA header it would require working out where it is and breaking out a soldering iron. On the plus side, once you see how the hardware fits together, its quite nicely designed.
I don’t have my unit any more otherwise I could have a look to confirm, but from memory, it wasn’t immediately obvious to connect a monitor to it and the USB to serial device worked well enough. Have a play with it, David! It’s a fun thing to do 😀
Just did this process on an Ultra 2 and Ubuntu 16.04.
The first hurdle was connecting to the serial console – the MAX3232 serial->TTL thing from Shenzen was crap and didn’t work (surprise). I ended up using a the built-in 3v3 serial on the Raspberry Pi model B GPIO pins and running minicom on the Pi via SSH from my PC 😉
In my case the drives were jumbled around with every boot of the USB stick – sometimes the internal USB drive was assigned sdb, sometimes sdd. There was a problem with the GRUB installation, so upon reboot after installation there was nothing in the MBR. Solved that by booting the stick in rescue mode, assembled the raid and ran grub-install (to /dev/sdb — the stick was sda). Good thing there are GUIDs in fstab these days, I tell you.
Very nifty! Sounds pretty hard-core, using a Pi in the mix as well 😉 Weird that the MAX3232 serial->TTL didn’t work… But you got creative and got it sorted
Hello there,
I’m currently trying to achieve this small project as well 😉 but for whatever reason I can’t get minicom displaying me anything…. (also tried on windows with tera term or hyper terminal and all attempt failed). Nevertheless, the NAS is operational and seems to be working fine.I tested also the cable from usb to serial in the nas and there is conductivity so can’t be the cable to blame. The cable I use is PL2303H so i guess that here as well is good, right ?
Minicom tells me that it’s connected (on the bottom right) but still nothing get displayed… Would you have any idea to help me ?
Hi Adi,
That is indeed strange! I never ran into that issue, once I connected my serial cable and powered on the NAS I saw the system boot right away… Have you used your PL2303H previously? I’m asking because the electronics there might not work? So the cable has conductivity but something on that tiny board is broken. It’s a long shot, I know but that’s all I can think of at the moment.
Good luck!
Never used it before indeed. I’ll try to get a new one in case.
Not sure how much help I can offer, but this is the USB-Serial adapter I used: https://www.amazon.com/gp/product/B0769FY7R7/
Also, I had previously ran into an issue like you describe when attempting to use a TTL USB->Serial cable (like this one: https://www.amazon.com/gp/product/B00QT7LQ88/). It wasn’t until I got the RS232 cable that it seemed to work properly.
One final thought, are you sure you’ve got the send & receive lines/pins plugged in correctly? I guess you’d get this kind of behaviour if you send to the send pin instead of the receive pin.
yep I checked multiple time… i ordered a new cable CP2102. Let’s see if it works better as it could that I received a crappy one.
Would you know btw of it makes a difference if it’s a cp2102 va a pl2303 ? Or if it’s just the price/driver that are different ?
Yeah, of course you checked already 😉 Again, sorry – I don’t know how a cp2102 and a pl2303 are different for this. Keep us posted though on how the new cable works though!
Hi, so I received the module and now it actually works, but I can’t actually read anything on the screen. It show some grey characters and keep writing them… that happens when I just plug the power cable to the nas. so I guess some configuration that I’m missing but not sure which one…
Hey, progress! That’s good – if you get gobbled characters I’d double check the baud rate and parity bit.
Thks a lot btw for your time 😉 so the setup i’ve Pit is 9600baud Data 8 Parity none and stop bits 1
All good, Adi. I think that’s right… Once the NAS is booted, do you see the messed up characters respond to your keyboard? I’m hoping that will work and you can at least communicate back and forth with the device, even though it’s gobbled up…
Ok I got it between 2 cry of the baby ;). I had to set it up on 115200 8N1. Now I can see the Uboot logo…
Hopefully from now it will run smoothly 🙂 thanks again for your work and your time. Much appreciated 🙂
Good work, Adi! I hope everything works from here on in and I also hope to see a link to your blog post about how you did it and what settings worked for you 😉 Clearly this is a bit outdated now and should be superseded by something new and shiny!
Best wishes
I really enjoyed reading all this and am considering this project for a ReadyNAS RN516. I have had little success with the TTL Console but it sounds like others are doing better in that area. I very much appreciate all the effort by the original author and all comments contributors.
Hi Nerdyness, I know this thread is old but I just got one of these and i’m interested in the project. Btw very nicely written ‘how to’. Are there any updates to this?
Hi Geoff, Thank you for your interest in this. I don’t have any updates on this and I don’t have my ReadyNAS unit any more either. Maybe other people who have since gone and set up their own solution have some input in case you’re stuck. Sam’s comment from 2018 links to a GoogleDoc that’s more up to date.
That is the latest information I have. I wish you good luck and a successful project!
Hello. Please excuse the wall of text but I think there might be some useful bits if someone stumbles upon this in the future.
I know it’s an old thing nobody cares about, but this guide helped me revive two of those units I basically thought of as e-waste. Those x86 units are actually great and sometimes you can find them for the price of trash.
I have Readynas Duo Ultra and Pro units – the Pro has a dual core, quad thread Atom D525 CPU, the Ultra has an N455 – single core, dual thread. Both CPUs are limited to 2GB of RAM and will refuse to even turn on if more memory is present.
At first I was getting gibberish in the console but connecting GND fixed it, some PL2303 chips are temperamental about ground. Then it went rather smoothly, I opted for installing Openmediavault since that’s what I would use anyway and it has Debian underneath. I installed it on a MicroSD card in a USB adapter which is not optimal but I used a card designed for surveillance devices which has much better endurance. There is also a plugin for OMV which lowers number of writes for installation on flash devices, so I took the risk.
What I learned is that you can boot almost anything from the USB ports when holding the “backup” button. My guess is that you can install the OS using any x86 machine and just plop the USB drive into the Readynas unit, in fact the installation I made on the first unit happily boots on the second one so I can just copy the card and don’t have to go the whole installation route for the second time.
Now I need to figure out the /boot partition issue. I can only boot the device by holding the “backup” button, otherwise it insists on booting from the internal flash, which is a mild inconvenience and can’t be changed in the BIOS. I reckon it’s a matter of copying the /boot partition from the MicroSD card to this flash and mounting it as /boot, but I have to admit, I’m much more of a hardware guy so it’ll take me a lot of trial and error to figure out.
Either way, thank you for this writeup. I was ready to go the hardware way, discard the main board and retrofit a Raspberry Pi with USB-SATA controllers into this thing, but this is much better.
Hey Lucas, I’m glad to hear this old post is still helpful to people out there, thank you for checking in and leaving this comment 👍
With regards to your boot/backup button issue, you may have tried this already but my first instinct would be to press the backup button to boot into your Openmediavault set up and then re-install the boot-loader from there to the built-in flash chip. It’s been a while since I played with and even thought about anything like that myself so no guarantees 😆 Good luck!