Wildcard certificates with Let’s Encrypt and DigitalOcean

About

This is more of a quick tutorial for me so I don’t forget rather than a comprehensive guide on the subject and tools. There are a lot of external links in this article if you’re keen to read more.

Background

Let’s Encrypt has always been a really interesting project to follow – in short, you can think of it as an API for free SSL/TLS certificates. It uses the ACME (Automated Certificate Management Environment) protocol to communicate with it’s users.

The good people at EFF have done some amazing work and integrated automatic wildcard certificate creation/renewal in their API client, certbot. The ability to handle wildcard certificates was finally released with ACME API v2 in March 2018 and certbot v0.22.0 and newer. This made a lot of people on the Internet very happy πŸ™‚

Another great thing about certbot is it’s modular structure which allows you to use modules to install the newly created certificates in your web servers or to automatically perform the domain validation for you to prove that you own the domain.

Instructions

Let’s talk about an example where you have multiple domains with DigitalOcean, one of the leading cloud providers in the market. I’m expecting you to be on a Debian-based system, maybe Ubuntu 16.04. Ubuntu 16.04 is a good example because the version of certbot that ships with it is newer than v0.22.0 and thus can handle wildcard certificates.

To install certbot and the DigitalOcean plugin simply type:

sudo apt install --yes \
     certbot \
     python3-certbot-dns-digitalocean

You can verify that the plugin is installed and working via:

certbot plugins

Which should show the “dns-digitalocean” plugin.

The next you will want to do is create a new dedicated API key for this, call it something like “letsencrypt” so you will know in future what the key is used for. You need to store that key on the your machine – replace “KEY” with your actual DigitalOcean API key in the commands below:

sudo touch /etc/letsencrypt/digitalocean_api.key
sudo chmod 400 /etc/letsencrypt/digitalocean_api.key
sudo bash -c "echo 'dns_digitalocean_token = KEY' > /etc/letsencrypt/digitalocean_api.key"

If you’re like me, and you like to be in charge of the certificate installation yourself, certbot lets you pass in the sub-command certonly which will only fetch the certificates for the domains you’ve specified and not modify your web server configuration. In saying that, I did do a test run with nginx and certbot and the nginx installer plugin did a magnificent job of updating the nginx configuration. I recommend that you look have a look at the other certbot sub-commands while for this example we’ll be using certonly. (NOTE: that certbot can also install the cert for you in your webserver’s configuration if that’s what you prefer.)

sudo certbot certonly \
   --dns-digitalocean \
   --dns-digitalocean-credentials \
       /etc/letsencrypt/digitalocean_api.key \
   -d *.domain1.tld \
   -d domain1.tld \
   -d *.domain2.tld \
   -d domain2.tld

You can find your certificate files in /etc/letsencrypt/live/domain1.tld/* which are symbolically linked to /etc/letsencrypt/archive/domain1.tld/. These certificates are now valid for 90 days which isn’t too long, surely you don’t want to have to log on to your server every 3 months and renew your SSL/TLS certificates. For that reason, certbot installs a cron-job in /etc/cron.d/certbot which will automatically renew your certificates based on a configuration file /etc/letsencrypt/renewal/domain1.tld.conf. You’re advised to have a look at these files and make sure they look alright.

You will see that /etc/cron.d/certbot runs the sub-command renew which luckily comes with a flag –dry-run, this can be your final test before forgetting about SSL/TLS certificates for a long time πŸ™‚

sudo certbot --dry-run renew

The output of this should perform the DigitalOcean DNS challenge regardless of whether the certificates are due for renewal or not. Your certificates will be marked for renewal every 60 days which gives the daily cron-job /etc/cron.d/certbot more than enough time to generate new certificates for you.

Enjoy your free wildcard certificates!


Concurrent CI/CD Pipelines with GitLab CI and Docker in Docker (DinD)

TL;DR: How I got Docker-in-Docker to work using GitLab CI to execute concurrent builds (with nearly reduced run-times).

Strap yourselves in and have a cup of tea ready, this is going to be a long one.

For a few months now I’ve been part of a project and submersed in the world of Docker, GitLab CI and various environments – all on-prem. Things were good, we finally got to a point where our pipelines were stable and when tests failed we had a high degree of confidence it was in fact because the code was buggy and not the test suite or the pipeline itself.

Our CI/CD pipeline

Quick note on our Environments

We have a local “dev” and “test” environment, as well as “ci“, “demo“, “prod” and “prod2” environments. Dev and test are running on the dev’s laptops using Vagrant, the other environments are a single VM, each. Ci is a VM running the GitLab runner and demo, prod and prod2 are simply running Docker engine (accessed remotely via docker-machine from the ci VM). Prod2 even has some Continuous Deployments set up whenever our pipeline passes seeing that it’s a mirror of prod and not customer facing. Deploys to prod and demo were triggered manually via GitLab’s trusted click-button deploy I had set up in my .gitlab-ci.yml file.

The pipeline

A full pipeline with a warmed up Docker cache (all images are locally available) takes us just under 10 minutes to complete which could be better but isn’t the worst runtime you could have.

Screenshot from 2017-10-21 14-45-21

GitLab has a concept of jobs and stages, we have 5 stages as you can see above: build, start, test, cleanup, deploy.

Build downloads all dependencies and builds brand-new Docker images. Start runs a docker-compose up command to fire up all our containers. Tests runs all our various tests from unit tests, to behavioural tests and some end-to-end tests too. Cleanup removes old images and pushes tested images to our GitLab registry from where images are being deployed. The deploy stage automatically deploys the latest code to prod2 (in the screenshot it’s called “standby”).

While I was generally happy with this and we had come a long way, the lack of isolation forced us to run all jobs and all pipelines sequentially and this was really bugging me.

Concurrent builds

GitLab’s scheduler

To allow jobs to run in parallel you can put them in the same stage. Unfortunately we weren’t able to run multiple pipelines in parallel because we were using the local shell executor to start named containers and our image logic relied on reaching other containers by their defined names. You can’t have 2 containers running simultaneously both called “api”.

The bigger issue was that even with concurrency set to 1 in our GitLab runner, GitLab’s scheduler has a weird characteristic. It treats a pipeline not as 1 pipeline, it treats it as a collection of individual jobs. Let’s say 1 pipeline has 10 jobs, it puts 10 individual jobs on the scheduler. If a push triggers a 2nd pipeline to run, the GitLab scheduler will alternate between one job of the already running pipeline and one job of the newly started pipeline. This meant that after 2 jobs, “build” and “start”, both concurrently running pipelines were now testing the code of newly started pipeline. Yikes! (There is this open issue about it if you want to read more.)

Isolating the builds from each other

It was clear that some further isolation is required and after a bit of research I saw that GitLab offers Docker-in-Docker (DinD). Following the instruction in this, the DinD setup works out of the box however, while this is convenient I don’t see the use of it.

After a bit of playing around I saw that GitLab starts 2 containers, one DinD container running in privileged mode and 1 container corresponding to the job that’s currently running. The latter has the DOCKER_HOST variable set to the dind container, so all Docker commands target the dind container and there is no local Docker daemon running.

Private registry

We used a self-signed SSL certificate for our GitLab server and thus our GitLab’s Docker container registry was using the same self-signed certificate. This meant that the Docker daemon needed to trust the CA that signed this certificate. I thought it’d be easy to replace the suggested docker:dind image with my own custom image that already trusts our registry. After building my own DinD image, however all the glue that held this together (basically a lot of environment variables GitLab CI sets for you) was no longer there. It took a bit of trial and error and some troubleshooting to figure out which variables to set.

DinD and Docker’s build cache

Eventually I figured out I can set the DOCKER_HOST environment variable in the before_script in the .gitlab-ci.yml file in order to use a custom dind image.

Now that this initial hurdle was cleared, I could finally build some images and push them to our registry. This is the moment when I realised that using a clean DinD container means our pipeline takes over 30 minutes to complete the build stage! Leave alone testing everything else. I had to somehow bake in Docker’s build cache into my DinD image. After one initial run through the build stage, the Docker build cache was already over 2GBs large which would result in a pretty big DinD image. This wouldn’t be too bad, however GitLab-CI’s Executor insists on pulling the image from a remote registry at the start of every job, which would have cranked up the runtime of my pipeline compared to the original ~10 minute mark.

GitLab’s DinD implementation

Another hurdle that made this task seem impossible is that GitLab does not re-use the DinD container it is starting for the pipelines. At the start of every job it spins up a new DinD container and a new container for the current job. This has multiple implications, firstly, it means that once we build an image based on our source code, it needs to be stored in a registry so it can be used in the next job/stage. This is already pretty ugly since the images may not pass the tests and you have to reliably be able to delete the layers/images from your registry. Secondly, and this is huge (!!), it means we can’t start the containers in one job and then run a full stage of tests (5 jobs in our case) against them… we’d have to pull the DinD image, the images we wanted to test, then start up the containers for every job or run all our tests in just one job. Clearly this wasn’t the way to go.

The solution

At this point it didn’t look like I’d ever implement concurrent builds using GitLab CI but then I had a great idea…

How about I ignore GitLab’s well meant DinD solution and go all DIY on this?

What I mean by that is I can use the shell executor I’ve been using all this time and roll my own DinD setup. The following sections explain how I solved the above issues.

Isolation

The first job of my pipeline starts a dind_$CI_PIPELINE_ID container (I’ll refer to this as dind_x from now on) and mounts a Docker volume which contains Docker’s build cache. Each Docker daemon assumes it is autonomously handling the cache, hence I duplicated it over 3 different volumes so we can run 3 pipelines in parallel. The script that starts the dind_x container does a quick check which volume is free and attaches it to the new dind_x container. When there is no volume available, it exits non-zero and thus cancels the pipeline.

Using a before_script we can easily make each job target the dind_x container. Just as GitLab’s Docker-in-Docker (DinD) implementation, we also set the DOCKER_HOST variable via a before_script in our .gitlab-ci.yml, to use the corresponding dind_x container.

before_script:
- ./start_dind_x.sh $CI_PIPELINE_ID $CI_JOB_STAGE
- export DOCKER_HOST="tcp://$(DOCKER_HOST= \ 
    docker inspect --format \
    '{{ .NetworkSettings.Networks.bridge.IPAddress }}:2375' \
    dind_$CI_PIPELINE_ID)"

This makes every job in that pipeline target only it’s corresponding dind_x container and thus each pipeline is isolated from each other.

For reference, here is the script I wrote:

#!/bin/bash

# Starts a Docker dind container with an available docker-cache-x volume attached.

find_free_volume() {
	if [ $(docker ps -q | wc -l) -eq 0 ]; then
		# No containers running, pick the first volume
		FREE_VOL=${DOCKER_VOLUMES[0]}
		return
	fi

	for i in $(seq 0 $((${NUM_VOLUMES} - 1))); do
		# ToDo: This could be changed to `docker ps --filter volume=docker-cache-0`
		docker ps -q | xargs docker inspect --format '{{ .Mounts }}' | grep ${DOCKER_VOLUMES[i]}
		if [ $? -eq 1 ]; then
			FREE_VOL=${DOCKER_VOLUMES[i]}
			break
		fi
	done
}

STAGE_NAME="$2"
if [ -z "$STAGE_NAME" ]; then
	echo 'No pipeline_id passed as argument.'
	echo "Usage: $0 PIPELINE_ID STAGE_NAME"
	exit 1
fi

if [ "$STAGE_NAME" == 'cleanup' -o "$STAGE_NAME" == 'deploy' ]; then
	echo "No dind_x container needed in $STAGE_NAME."
	exit 0
fi

# Sleep a random amount <1 second to give one of the build stages a head start
sleep .$RANDOM

PIPELINE_ID="$1"
docker ps | grep "dind_$PIPELINE_ID"
if [ "$?" -eq 0 ]; then
	echo "Using existing dind_$PIPELINE_ID."
	exit 0
fi

# List all docker-cache-x volumes in an array
DOCKER_VOLUMES=(`docker volume ls -f "name=docker-cache" --format {{.Name}}`)
NUM_VOLUMES="${#DOCKER_VOLUMES[@]}"
if [ "$NUM_VOLUMES" -eq 0 ]; then
	echo 'No docker-cache-x volumes found.'
	exit 1
fi

find_free_volume
if [ -z "$FREE_VOL" ]; then
	echo 'No available docker-cache-x volumes found.'
	echo 'The following dind containers must be using up all volumes:'
	docker ps --all --filter name=dind_ --format "{{.Names}}"
	echo 'If any of the above pipelines is no longer running, try to run the manual clean up task.'
	exit 1
fi

echo "Starting dind_$PIPELINE_ID with $FREE_VOL as cache."
docker run --rm -v $FREE_VOL:/var/lib/docker \
	-v /home/gitlab-runner/:/home/gitlab-runner/ \
	--name "dind_$PIPELINE_ID" --privileged -d \
	gitlab:4567/docker:dind \
	--storage-driver overlay2 || true

# Wait for container network to be available
sleep 1
# Use endless-loop and netcat to check if container is up
while [ true ]; do
	docker inspect --format '{{ .NetworkSettings.Networks.bridge.IPAddress }} 2375' "dind_$PIPELINE_ID" | xargs nc -z -w10
	RETVAL=$?
	if [ $RETVAL -eq 0 ]; then break; fi
	sleep 1
done

Previous issues

Private registry

Starting the dind_x container ourselves, it was now quite straight forward to bake a copy of our CA certificate into the DinD image which let’s docker access our GitLab registry.

FROM docker:dind

RUN set -xe \
    && apk add -U openssl \
    && echo | openssl s_client -connect gitlab:4567 2>/dev/null | \
        openssl x509 > "/usr/local/share/ca-certificates/gitlab.crt" \
    && update-ca-certificates

DinD and Docker’s build cache

Instead of creating one giant 6GB DinD image containing a static set of the build cache, we now have a “fleet” of Docker volumes that can be attached to any dind_x container and thus the build cache stays current and the dind_x container starts very quickly.

GitLab’s DinD implementation

GitLab’s Docker executor will always pull a remote image regardless of whether it exists locally. So our image would have taken some time being downloaded for every job. Using the Shell executor however, all we do now is execute  docker run to launch our dind_x from a local image.

This solves all problems that were holding us back from running concurrent pipelines and even allowed us to reduce build-time even more.

Unexpected wins

I had initially thought we need to rewrite some of our tests however as it turned out this wasn’t necessary because every test job is run inside a container and this will be part of the little isolated ecosystem under dind_x.

Being able to increase the concurrency, I could increase the executor and run a number of jobs in parallel. The first example was the build job which used to build each container sequentially. With a higher number of concurrent execution, we could not only build our container images in parallel, we could actually use more of the machine’s resources. Given that my goal was to simply run pipelines in parallel this was a nice little bonus which I didn’t set out to get but I was very happy about.

How to get into Linux?

Every now and then a Linux-newbie approaches me while trying to learn the ways of the force, i.e. to become more familiar with Linux. This post is the start of a hopefully comprehensive collection of easy ways to get deeper into Linux.

PodCasts are a great way of getting the latest and greatest information about various topics in an easily digestible format. I personally used to listen to a lot of PodCasts but don’t have the time any more so I only stick to a few. At the moment I’m listening to The Linux Action Show which I recommend. Also, especially if you’re new to Linux subscribe your favourite PodCast player to “Going Linux“.

It wouldn’t hurt to pick a few other podcasts from http://www.everydaylinuxuser.com/2014/02/top-9-linux-podcasts.html.

Subscribe to Full Circle Magazine and read some issue.

Have a look at these commands or Linux Survival along with The Linux Documentation Project (the last two options were stolen from a coworker – Hi Aaron Borkovec).

If you have your own tricks that would make nice additions to the above, please leave me a comment and I’ll add it here.

Installing Ubuntu 14.04 server on a Netgear ReadyNAS Ultra Duo v2

About

This blog post talks about installing Ubuntu 14.04 server on my Netgear ReadyNAS.

Intro

Many, many moons ago I bought myself a Netgear ReadyNAS – a small 2 bay unit for not much money and at first I was very happy with it. But I’m a nerd! So naturally over time I want to play with things and get more out of the unit than the manufacturer wanted to give me.

What it can do

It really helped to install the root extension and be able ssh into the unit. That meant I could install dnsmasq and define some hosts in /etc/ethers and /etc/hosts so dhcp and DNS was sorted. I also installed transmission which made the unit that little bit more useful.

What it can’t do

I was always hoping for an easy way to install OpenVPN on it – after all, my unit is an x86 box running Linux; how hard can it be?! Turns out it ain’t easy – not that I tried πŸ™‚ I read up on it and gave up before starting. So that bugged me. Friends around me started buying things like the HP ProLiant N54L MicroServer which hangs in the same price range but totally wins in every category when compared to my ReadyNAS.

The straw that broke the camel’s back was when I moved into my new house. I now share the house with non-nerds who probably should be on a separate network to me. Also, it’s always bugged me that the WiFi is bridged into my home network – so just for some added security and safety I was going to separate the house into 2 networks using the 2x1GigE nics in the NAS, only to learn that the unit can’t do NAT! There is no support for it in the kernel and I was surely not going to compile a kernel on this unit without the ability to fix things that may break.

The solution

After a bit of reading on the web I found out that you can use a serial console port on the back of the unit to get a KVM connection, so you can get a keyboard and a screen connected. You can then also boot from a USB drive and install your operating system of choice. I had previously played with FreeNAS and I do think the filesystems are better in BSD-landi but my BSD experience is non-existent and so I opted for Ubuntu server.

Ideas started to form

With the possibility of installing Ubuntu on the ReadyNAS so many things seemed suddenly possible.

  • Format everything using btrfs and use it’s built-in RAID1 feature.
  • Run an OwnCloud server.
  • Like so many others I’m affected by a buggy out of the box modem/router which can’t do port forwarding – this can go in bridge mode and the NAS can do this.
  • Separate my home network into “WiFi and others” and “privileged” πŸ™‚
  • Install an ntpd, transmission, OpenVPN

How?

The serial connection

Buy the hardware

Buy yourself a little serial to USB adapter if you haven’t got one already. I didn’t and opted for the naked version (pl2303HX) which cost me just AU$6.20 including shipping! (I bought mine from top_electronics_au on ebay but am not affiliated with them in any way).

Connect the hardware

On my unit the serial port was covered by a sticker – peel that off and connect your serial adapter to the pins underneath this.

serial console cover

Note that you will have to connect the RX/TX lines crossed. From right to left, you’ll have +5V, then TX, RX and Ground. My serial to USB adapter mentions 3.3V and since all components are powered in some way I didn’t hook 5V and ground up – only RX/TX (crossed).

serial-port-connected

Set up the software

I was able to get minicom to work using 9600 baud and 8N1 on /dev/ttyUSB0, YMMV. After plugging in the USB to serial adapter, have a look at `dmesg | tail` to see what device has been assigned to it. Then run `minicom -c on -s` to enter setup mode and configure your connection. Exit setup mode and hit return a few times, your screen should update.

Word of warning: like with any serial connection it has issues when you hammer it – so don’t hold the backspace key and wait for your line to be deleted. You’ll have to feed in one after the other key stroke.

Back things up

Ever since I bricked a Samsung Galaxy SIII in a similar operation and didn’t have a backup I can’t stress enough how important it is that you back things up! I ran the following commands first when ssh’d into the NAS:

log_command() { echo $* >> NAS_log.txt; $* >> NAS_log.txt; }
log_command mount
log_command cat /etc/fstab
for i in /dev/md?; do log_command mdadm --detail $i; done
log_command pvdisplay
log_command vgdisplay
log_command lvdisplay
do log_command sgdisk -p /dev/sd? ; done

This will define a new command “log_command” which simply puts all arguments into a text file and then executes the arguments and puts the output in the same text file. This comes in really handy in case you’d like to restore.

Boot from the thumb drive

Now that we’re a bit more familiar with the NAS let’s boot of a USB thumb drive. The NAS won’t boot of a USB CD-ROM btw.

Create the thumb drive

I used UNetbootin to create my thumb drive.

  1. Plug in the USB and let it auto-mount
  2. Start UNetbootin as root
  3. Select which Ubuntu ISO you’d like to flash on the thumb drive

This gives you a fairly standard bootable USB key but we do want the console output redirected to our serial console cable and have to set up syslinux for it first.

Redirect output to the serial console

Edit the syslinux.cfg on the root of the USB key and add the following 2 lines as the first lines:

SERIAL 0
CONSOLE 0

“SERIAL 0” tells syslinux to print the output to the first serial console (0) and needs to be the first line. The second line stops syslinux from printing anything to the standard console. With those 2 lines you will get a boot menu over the serial console. The next step is to change the boot entries to also redirect output to the serial console.

This is the stanza UNetbootin creates for the “Default” entry:

label unetbootindefault
menu label Default
kernel /ubnkern
append initrd=/ubninit vga=788 -- quiet

Change the last line to:

append initrd=/ubninit console=ttyS0,9600n8

Removing “quiet” will give you the output that’s otherwise suppressed and replacing vga=788 with console=ttyS0,9600n8 again tells syslinux which serial port and other connection parameters to use.
I went through and did that for all stanzas so I could easily boot into the rescue image or the memtest.

Boot the NAS of the thumb drive

Plug the prepared USB drive into any of the USB ports and hold down the “backup” button at the front of the unit as you power it on.
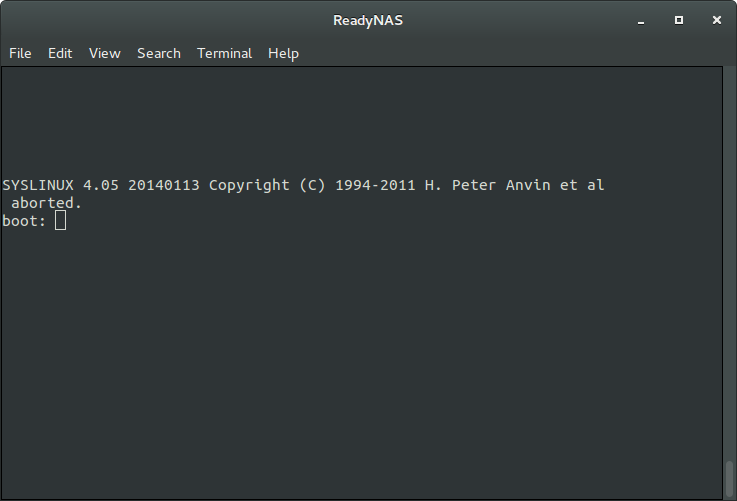
In minicom immediately start hitting the ESC key until you see the below screen:

SYSLINUIX

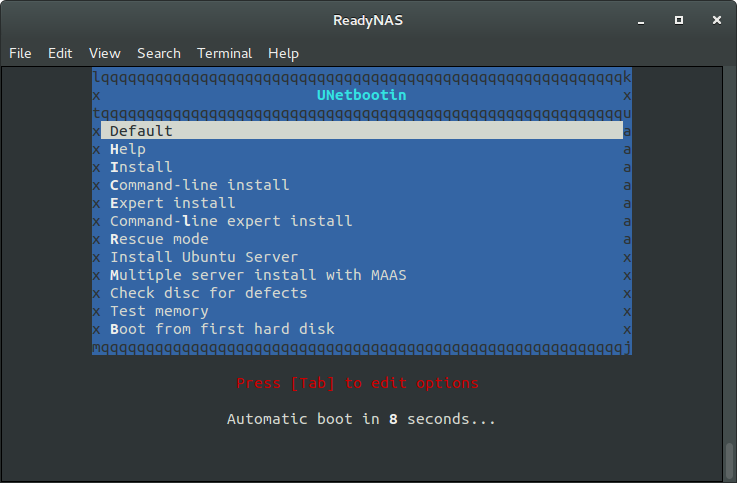
Hit return for the boot menu or [tab] for all entries in plain text. After you’ve hit return you should see this screen:

boot menu

Boot into Rescue mode

I opted to first boot into rescue mode and take a backup of all partitions. When booted from the USB key in rescue mode I found the following partitions:

  • /dev/sda1 (vfat) 126MB bootable partition
  • /dev/sdb1 my USB I booted from
  • /dev/sdc & /dev/sdd == The 2 bays
  • /dev/md125 == 2TB (c VG)
  • /dev/md126 == 0.5GB (swap)
  • /dev/md127 == 4GB (root)

/dev/sda1 is the bootable partition the NAS starts from but it’s inaccessible when booted normally.

Back things up

In case something went horribly wrong I wanted to be able to restore the partitions as they currently are. I didn’t have to restore anything so this is untested but dd’ing the partitions away seemed reasonable.

mount /dev/c/c /mnt/ # mount your ReadyNAS RAID volume group
dd if=/dev/md127 of=/mnt/root.fs.dev.md127.dd # copy the root partition onto the RAID volume
ls -l /mnt/root.fs.dev.md127.dd # check that the size matches roughly
-rw-r--r--    1 root     root     4293906432 Mar 31 01:15 /mnt/root.fs.dev.md127.dd
mkdir /mnt/test # create a new mount-point
mount /mnt/root.fs.dev.md127.dd /mnt/test/ # mount your copy
ls /mnt/test/ # compare things look as expected
umount /mnt/test/
dd if=/dev/sda1 of=/mnt/boot.fs.dev.sda1.dd # rinse and repeat for the boot partition
mount /mnt/boot.fs.dev.sda1.dd /mnt/test/ # mount your copy
ls /mnt/test/ # compare things look as expected
umount /mnt/test/

I then rebooted and saved the two dd files along with all my other data on a separate drive.

Install Ubuntu

This is the boring step now – as described above, boot from the USB thumb drive and select “Default” in the boot menu.

I had trouble with the installation process due to a faulty USB thumb drive but once I swapped it the installation was a breeze.

Make sure you use /dev/sda1 as the /boot partition and that you install the boot loader on /dev/sda. The installer does that automatically once you select /dev/sda1 as /boot.

Filesystems

I felt pretty adventurous and decided to go for btrfs! Filesystems

Since I don’t know how to choose btrfs’ built in raid1 capabilities from the installer I opted for the above partition layout and a life rebuild post installation.

Building a raid1

First I had to create another partition on the hard disk that’s not in use. The simplest way seemed:

cgdisk /dev/sdb
# Make sure your partition tables are identical:
sgdisk -p /dev/sda
sgdisk -p /dev/sdb

Then create the new btrfs filesystem and add it to the exisitng one to convert it to a raid1:

mkfs.btrfs /dev/sdb1
btrfs device add /dev/sdb1 / 
btrfs balance start -dconvert=raid1 -mconvert=raid1 /

This worked although there is something weird going on. For some reason the reported filesystem capacity and disk usage doesn’t match up. “df” shows a total capacity of 3.7TB with 3.4TB in use. While “du” shows 1.7TB total usage on my 2TB raid1.

# df -h / /home
Filesystem      Size  Used Avail Use% Mounted on
/dev/sda1       3.7T  3.4T  258G  94% /
/dev/sdb1       3.7T  3.4T  258G  94% /home

# du -hsc /
1.7T    /
1.7T    total

# btrfs device scan
Scanning for Btrfs filesystems
btrfs filesystem show
Label: none  uuid: c5d5a3ed-2b45-4340-8e38-a107fde8df2b
        Total devices 2 FS bytes used 1.69TiB
        devid    1 size 1.82TiB used 1.69TiB path /dev/sda1
        devid    2 size 1.82TiB used 1.69TiB path /dev/sdb1

I tried an online re-balance of the raid but that didn’t work:

# btrfs filesystem balance status -v /
No balance found on '/'
# btrfs filesystem balance start -v /
Dumping filters: flags 0x7, state 0x0, force is off
  DATA (flags 0x0): balancing
  METADATA (flags 0x0): balancing
  SYSTEM (flags 0x0): balancing
 Done, had to relocate 1736 out of 1736 chunks

If I do get to the bottom of it I’ll report it here.

Edit: So you’ve had your first blackout

I thought I’d add these steps here because after my first blackout the NAS wouldn’t boot at all. It was waiting patiently for me to make a choice between “Ubuntu” and “Advanced options”.

The following lines make Grub2 select the right entries by default and also print the kernel output to the serial console for potential debugging. Edit /etc/default/grub

GRUB_DEFAULT=0
GRUB_HIDDEN_TIMEOUT=
GRUB_HIDDEN_TIMEOUT_QUIET=true
GRUB_TIMEOUT=2
GRUB_DISTRIBUTOR=`lsb_release -i -s 2> /dev/null || echo Debian`
GRUB_CMDLINE_LINUX_DEFAULT=""
GRUB_CMDLINE_LINUX="console=tty0 console=ttyS0,9600n8"
GRUB_TERMINAL=serial
GRUB_SERIAL_COMMAND="serial --unit=0 --speed=9600 --word=8 --parity=no --stop=1"

Then, don’t forget to run

sudo update-grub2

for the new settings to take effect.

Result

I am more than happy that I did this and was able to share the experience here! If you’ve got a ReadyNAS and are sitting on the fence, I highly recommended this to satisfy your inner nerd! πŸ™‚

Things I googled that were helpful
One-Time-Passwords using oathtool on Ubuntu 14.04(+)

So I’ve finally found the motivation and the time to set up OTP for my ssh logins!

DISCLAIMER: Let me say upfront that there are plenty of articles on using Google’s GAuthenticator which I didn’t want to use. Since the whole PRISM thing was leaked I try to decentralise my data as much as possible and distrust big names more since they are surely a more attractive target than the small players.

After a bit of searching I found oathtool, a piece of software that seems to be relatively well maintained compared to S/KEY and others. The concept is simple, you can choose between two types of OTPs, event based and time based. Event based OTPs are expired once they’ve been used for an event (e.g. a log in) or time based OTPs which expire every x seconds (default: x = 30 seconds).

I’ve chosen time based OTPs since I use this method to protect other online accounts like github.com and others. I use my Android device and the “FreeOTP” to keep track of my time-based OTPs. With TOTPs you have the following parameters that play a role at creation time.

  • The start time from which to count the TOTPs (see below why I’m not using this).
  • The number of digits each OTP is made up from.
  • A hex (or base32) encoded secret.

Using introducing the oath toolkit, the README on github, and this doco on code.google.com I managed to get the following going:

# Install oathtool.
sudo aptitude install -y oathtool libpam-oath

# Generate a secret.
export HEX_SECRET=$(head -10 /dev/urandom | md5sum | cut -b 1-30)

# Generate the TOTP details, 6 digits long.
oathtool --verbose --totp $HEX_SECRET
# Enter the base32 secret and the hex secret in your OTP app.

# Create and populate the /etc/users.oath file.
sudo touch /etc/users.oath
sudo chmod 0600 /etc/users.oath
sudo /bin/bash -c "echo HOTP/T30 $USER - $HEX_SECRET \
>> /etc/users.oath"

# Forget the secret!
unset HEX_SECRET

# Set up PAM.
echo "auth requisite pam_oath.so usersfile=/etc/users.oath
$(cat /etc/pam.d/sshd)" > /etc/pam.d/sshd

# Allow this in sshd and restart.
sudo sed -Ei -e 's/(ChallengeResponseAuthentication) no/\1 yes/' \
/etc/ssh/sshd_config
sudo service ssh restart

# Test.
ssh localhost
# You should see:
# One-time password (OATH) for `ubuntu':
# Password:
# Welcome to Ubuntu 14.04.1 LTS (GNU/Linux 3.13.0-44-generic x86_64)
# ...

As you can see by the example output in the above test, if you’ve followed the instructions correctly you will be asked for a TOTP first, and then for your user password afterwards. \o/

I’d have liked to set a different start-time for my TOTPs, oathtool supports ‘–start-time’ however there is no way to enter that in FreeOTP so it always assumes the default of ‘1970-01-01 00:00:00 UTC’. Took me a while to work that out, I had assumed that the start time was somehow mixed into the base32 secret but that’s not the case.

oathtool! Bloody oath mate πŸ˜‰

dot files

Remember the days when people put up their .rc files on their blogs? I used to do that too but these days, I *would* like to link people to my puppet manifest on github. (EDIT: Despite being secure i.e. not containing any passwords, there was a some information leakage and my employer encouraged me to make the repository private. I use bitbucket for that.) If you don’t know what Puppet is, you should definitively check out puppetlabs.com.

The only reason this page still exists because back in the day I worked for this lady who got angry when I changed global settings on the server to sensible defaults. Like “alias grep=’grep –color'” got me into trouble o.O So I created my own little environment that stayed persistent even when I sudo’d. This was mainly done via the following lines:

#always open VIm with my settings
alias vim='vim -u ~sk/.vimrc'
#create your our own 'bash' so root can run screen with my settings
echo '/bin/bash --rcfile ~sk/.bashrc' > ~sk/bash
chmod 755 ~sk/bash
#set my bash shell
export SHELL=`echo ~sk/bash`
#always run screen with my settings
alias screen='screen -c ~sk/.screenrc'

I even had .sync files kept on a web server so I could easily update once I made changes to the environment πŸ™‚

#If we have updates, we want an easy way of synchronisation
alias sksync='cd ~sk; wget --timeout=2 --tries=1 http://www.host.tpl/.bashrc.sync;
if [ "$?" == "0" ]; then mv .bashrc.sync ~sk/.bashrc; fi;
wget --timeout=2 --tries=1 http://www.host.tpl/.vimrc.sync;
if [ "$?" == "0" ]; then mv .vimrc.sync ~sk/.vimrc; fi;
wget --timeout=2 --tries=1 http://www.host.tpl/.screenrc.sync;
if [ "$?" == "0" ]; then mv .screenrc.sync .screenrc; fi'

My firefox add-ons

Below is a list of add-ons I use in my current Firefox profile and I’d recommend you use too! πŸ™‚

  • Adblock Plus – An advertisement blocker that can import filters from others
  • BetterPrivacy – Allows you to view and DELETE nasty LSO files
  • Bried – An RSS reader
  • Disable Ctrl-Q shortcut – ever tried to “Ctrl+a” but accidentally “Ctrl+q” 😦
  • DownloadHelper – store a local copy of a video on youtube and other sites
  • FireGestures – Control firefox with mouse gestures
  • It’s all Text! – Every textfield can be edited via your favourite text editor
  • Lazarus – re-populates data in forms if the browser crashes or similar
  • TabMix Plus – An Add-on to help manage a lot of Tabs

And good ones for development:

  • FireBug – “Web Development Evolved”
  • Tamper Data – lets you manipulate headers before you get redirected
  • Web Developer – lets you do all sorts of things to HTML forms and the like

You should have a master password set for Firefox anyway, however if you have more than one device, do yourself a favour and set up Firefox Sync (with a master password).